- First of all delete the existing key if you have.
- Go to setting,then select Option,Uncheck the "Enable Self Defense" and click OK.
- Now right-click the kaspersky icon from taskbar and click on "Exit".
- You will get a prom. Click "Yes".
- Now go to run and type in "regedit".
- Now goto HKEY_LOCAL_MACHINE --->SOFTWARE --->KASPERSKYLAB --->PROTEDCTED --->AVP9 --->ENVIRONMENT
- Now in the right hand side you can see PCID. Double click it and change the last two values before the flower bracket and click ok eg:- The last two values are "D7"...So i change it to "F9".
- Now open kaspersky again.
- Select "Activate trial License" and click next.
- Now enable Self-Defence and you are good to go.

Thursday, March 31, 2011
KASPERSKY 2011 LICENSE FOREVER
Wednesday, March 30, 2011
How to Change Windows 7 Boot Screen Using Windows 7 Boot Animation Updater
Now the wait is over. Since when Microsoft released Windows 7, no one was able to change the boot screen as it requires lots of files and certificates hacks.
But now Jeff Bush @ "Coder for life" website has developed an excellent tool which can customize Windows 7 boot screen.
"Windows 7 Boot Animation Updater" is a program that makes it easy to update the Windows 7 boot animation and text. It is written in C++/CLI and requires Microsoft .NET Framework 2.0 and the Microsoft WIM library.
Features List:
- Modifies the boot animation
- Modifies the boot text "Starting Windows" and "Microsoft Corporation"
- Will compile the animation from 105 BMP, PNG, GIF, or TIFF images
- Does not require any other applications (like ImageX)
- Designed to be idiot-proof by having numerous checks
- Automatically backs up the modified files
- Works for all versions of Windows 7: any language, any edition, 32-bit or 64-bit
- Works even if your setup has the hidden "System Reserved" partition
The software is available for both 32-bit and 64-bit versions.
HOW TO USE:
1. Download and run the program's exe file.
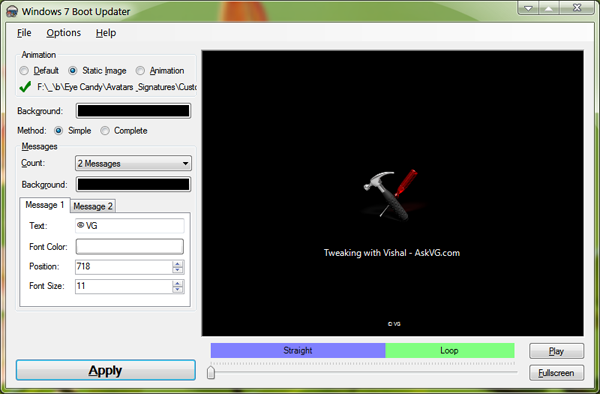
2. You can change the desired text messages, remove them completely, change their color. You can also select a static image to show as boot logo.
3. If you want to change Windows flag animation shown in boot screen, you'll need to create the animation. The animation can be a single 200x21000 px BMP file or you can create 105 BMPs, PNGs, GIFs, or TIFFs files and put them in a single folder. Make sure all the files must be the same format and will be played in alphabetical order at boot screen (so if you are numbering them, use three digits always, e.g. 000, 001, ..., 103, 104).
Click on "Animation" radio button and select the folder containing your images. It'll take a few seconds and you can restart your system to take affect.
HOW TO RESTORE:
If you get stuck forever in Windows Recovery Environment then you need to manually restore winload.exe. Here are the directions:
1. Once you enter Windows Recovery Environment press "Cancel" right away (while it is still scanning).
2. Click "Yes" on the warning that pops up.
3. Click "View advanced options for system recovery and support".
4. Select your keyboard types and click "Next".
5. Select an account (not "HomeGroupUser$") and enter password and click "OK".
6. Click "Command Prompt" (the last option) and enter following commands:
C:
cd \Windows\System32
del winload.exe
ren "winload - Backup.exe" winload.exe
cd \Windows\Boot\PCAT
del bootmgr
ren "bootmgr - Backup" bootmgr
exit
PS: Here C: in first line represents the system drive where Windows 7 is installed in your system. If you have installed Windows in any other partition like D: drive, then change the command to D:
7. Click "Restart" and you'll be able to boot into Windows again.
Saturday, March 26, 2011
HOW TO TRACE A HACKER WHO HACKED YOU

Here we go :)
1:open command prompt(CMD)
2:type in that netstat -b or -o
3:then you will see all the connections to your pc
4:open task manager then go to view then select columns then Process
Identifier(Pid)
5:now open CMD you should see all the ip and sites or networking
applications they have a Process Identifier
6:compare them and find a weired process like svchost then trace where the file is
7:kill the process then delete the file creating it, check your startup for it also
8:go to run and type msconfig
9:go to startup and disable all the things weird
very easy tutorial.......
Friday, March 25, 2011
Social-Network-Fake-Account-Makers-Are-Threatened with a fine upto 1000$

For some people,creating a fake account is social networking sites might be a fun joke.But don't ever try doing this kind of prank in California because you can face the law.It's not just a threat but there is a law governing this case.
California has set a law to arrest fake account makers or anyone who is impersonating someone else in the online realm.
"Anyone who intentionally and without consent impersonate someone else in the media through the Internet or other electronicmedias for the purpose of harming,intimidating ,threatening or deceiving others,has conducted a criminal offense,"read one of the points in the law,according to San Francisco Gate.
The punishment for perpetrators is not lite.Those who are caught making fake accounts could be thrown into prison or receive a fine of 1,000$.
So Please Co-Operate With Social Networking Sites Rules.If you dont want to Shutdown any Social Networking Site.Like Facebook,Orkut,Twitter etc..
Thursday, March 24, 2011
NetLimiter 3 Monitor is Finally Available to Download!
NetLimiter is one of the must-have on my computer. Although the main feature in NetLimiter is to control the , but my favorite feature is actually the traffic monitoring. I can easily see what IP address is a process is connecting to and how much bandwidth it is using. Most of the free network/tools can only tell you the bandwidth usage, but not for individual process. This is very useful for example, when Steam is updating the software and it takes really long with only progress meter showing the update percentage but not the speed. After waited for a few hours, the update is still running and you have no idea how fast is Steam downloading. With NetLimiter, you can know whether the update is really huge or the server is slow in sending the updates to you. Other than that, you can easily know which process is secretly connecting to the Internet which is a good way to know if you are part of a zombie botnet. Interestingly, I installed a keylogger on my test computer that hides itself using rootkit method which will not show up on Task Manager. When the send the logs via email, the hidden process shows up in NetLimiter 3 Monitor.
NetLimiter 3, a major update was released on end of August 2010 and the official website says that the free Monitor version will be available in next few weeks. After waited for nearly 7 months, the NetLimiter 3 Monitor is finally available to download!
Below is a sample screenshot of NetLimiter 3. As you can see, with one look you will know which process is using the Internet and expanding the process shows the destination IP and port that it is connecting to. Unfortunately the Monitor version does not come with the built-in Whois, Traceroute and but you can still perform all those tests externally in

NetLimiter 3 installation is normal like installing any other third party software except you will be prompted twice to install Locktime adapters and reboot is required in order to start the device software. NetLimiter 3 will run as after installation and will expire in 27 days (weirdly it’s not the standard 30 days trial). When the Pro version expires, you can revert it to the Monitor version by at the NetLimiter’s website for free. In a few minutes you will receive an email from NetLimiter Support with your registration name and registration code which can be used to register NetLimiter 3 Monitor.
I noticed that there is a bug with the limited features in NetLimiter 3 Monitor. When you check on the DL Limit checkbox to limit the download speed, the following error prompts:
Feature not supported.
product-id: 6
feature-name: Limiter
(Check event viewer for more details)
The Limits feature is supposed to be disabled and not usable in the Monitor version of NetLimiter but it still works. I tried downloading Firefox 4 installer and noticed that the download speed stayed around the limited 5KBps but once I uncheck the limit, the download speed immediately increased to 400+Kbps. The same thing also happens on Outgoing / Connection Blocker. Once checked, the process can no longer connects to the Internet. Only the Chart feature is successfully disabled.
Tuesday, March 22, 2011
KASPERSKY 2011 LICENSE FOREVER
- First of all delete the existing key if you have.
- Go to setting,then select Option,Uncheck the "Enable Self Defense" and click OK.
- Now right-click the kaspersky icon from taskbar and click on "Exit".
- You will get a prom. Click "Yes".
- Now go to run and type in "regedit".
- Now goto HKEY_LOCAL_MACHINE --->SOFTWARE --->KASPERSKYLAB --->PROTEDCTED --->AVP9 --->ENVIRONMENT
- Now in the right hand side you can see PCID. Double click it and change the last two values before the flower bracket and click ok eg:- The last two values are "D7"...So i change it to "F9".
- Now open kaspersky again.
- Select "Activate trial License" and click next.
- Now enable Self-Defence and you are good to go.
Saturday, March 19, 2011
Magic of VLC Player
Play in ASCII mode: VLC media player has an amusing ability, to playback movies in ASCII art. To enable ASCII mode, open VLC media player and click on Tools>Preferences. Open the section “Video” section and under “Output” select “Color ASCII art video output” from the drop down menu. Save it. Now play any video file to enjoy the ASCII art.
Wednesday, March 16, 2011
Protect CD Contents by Encrypting with TrueCrypt
If you ask anyone that knows about encryption, they would say that TrueCrypt is one the best out there. I have an old friend who used to be in the “scene” that was involved in warez and he uses TrueCrypt to protect the sensitivedata on his computer in case one day the authorities decides to bust in to his house. If one follows the guide on using a complex passphrase, even FBI hackers fail to crack TrueCrypt using the dictionary attack.One good thing about TrueCrypt is the portability where I can use it to by encrypting it and then save both the TrueCrypt Volume and the to a CD or DVD. The data in the disc will be which can be easily decrypted to access the files any time by just running TrueCrypt and mounting the volume with the correct password. The decryption is done instantly (on the fly) so you can immediately access your files upon entering the correct password. There are some such as CD-Lock and GiliSoft Secure Disc Creator that encrypts disc but I will show you how you can do that for free with TrueCrypt.
Follow This Steps
1. Download the latest version of TrueCrypt. Currently the latest version is 7.0a.
2. Mount volume (map the encrypted space to a drive letter) Refer step 11
3. Copy files to Volume (Move any files to the mapped drive that you want to encrypt) Refer step 12
4. Dismount Volume (unmap encrypted drive). Refer step 13
Follow This Steps
1. Download the latest version of TrueCrypt. Currently the latest version is 7.0a.
2. Run the TrueCrypt (TrueCrypt Setup 7.0a.exe). select Extract.
3. Run TrueCrypt.exe and click on Create Volume button.
4. Select “Create an encrypted container” and click Next.
5. You are asked to either select “Standard” or “Hidden” TrueCrypt volume. This feature is very interesting and I hope I am able to explain in an easier way to understand.
The Standard volume let’s you create just one encrypted space. Let’s say you’re being threatened to reveal the password or something bad is going to happen to you. Revealing the password will decrypt all the encrypted files and the person who threatened you get all the files.
As for Hidden volume, it creates another encrypted volume on the existing encrypted space with another password. So if you gave the first password, the hidden volume will still stay hidden and not be revealed. Only if you mount the volume using the hidden volume password, then only the hidden volume will be mounted.
As a simple test, we’ll select the “Standard TrueCrypt volume” and click Next.
6. Now you’re asked to specify where should the TrueCrypt volume be saved to. Click the Select File button and set a name for example, dummy, and click Next.
7. There are a bunch of encryption algorithms to choose. Let’s leave it as default and click Next.
8. A normal CD have 650-700MB in space and DVD is 4.7GB. If you’re going to create an encrypted CD, let’s create the volume size as 600MB and click Next.
9. Enter a password. Make sure you use a good password and remember it. If you lose the password, you are not going to get back the encrypted files.
10. Click the Format button to format the volume and wait for a few seconds. Click Exit when the volume is created.
11. Now you’re back at the TrueCrypt main interface. Click on any drive letter that is on the program, and click the Select File button. Select dummy file and then click the Mount button. Enter the password that you’ve specified in step 9.
12. Go to My Computer and you will see a new drive letter. Alternatively you can also double click on the drive that is mounted at TrueCrypt to directly open the drive. That is the encrypted volume (space) which is now decrypted. Copy the files that you want to encrypt to the drive.
13. Once you have finished copying the files to the mounted volume, to dismount, simply click on the drive at TrueCrypt to make sure that it’s highlight and then click the Dismount button. Click Exit to close TrueCrypt.
14. To put it on a CD, just burn the 4 TrueCrypt files (TrueCrypt.exe, TrueCrypt Format.exe, truecrypt.sys, truecrypt-x64.sys) and dummy file to the disc.
To access the encrypted files in future, insert the CD to your , run TrueCrypt.exe and follow step 11 to mount the TrueCrypt volume. The files will be read-only and cannot be modified since it is written on a disc.
Here is how TrueCrypt works in summary:
1. Create volume (make an encrypted space): Refer step 3 to 102. Mount volume (map the encrypted space to a drive letter) Refer step 11
3. Copy files to Volume (Move any files to the mapped drive that you want to encrypt) Refer step 12
4. Dismount Volume (unmap encrypted drive). Refer step 13
Friday, March 11, 2011
Missing DLL Files?? Get it here...
Everyone has received a "Couldn't find ****.dll..." pop-up message at some time.
Well folks, your problems are over!
Here you will find the most common files that may be missing or corrupted on your computer. Feel free to download at no cost!
Links ::
Code:
http://www.ocxdump.com/
Code:
http://www.dll-files.com/
Code:
http://www.dlldump.com/
Search ^ download the missing or corrupt .dll or .ocx file from the above sites
Copy/paste them in C:\WINDOWS\system32
That's it!!
Magic of VLC Player
What u can do with VLC player??
For most people, VLC is the favorite media player because it plays everything they throw at it without hiccups. No hunting for codec. But VLC can do a lot of other things as well. Find out how many of these listed below you knew, and how many you did not.
1. Rip DVDs: VLC includes a basic DVD ripper. You probably would never use it when there are better DVD rippers available, but it helps to know that you can in fact, get a decent quality DVD rip with VLC. To rip a movie follow these steps:
* Go to the Media menu and choose Convert/Save. Click on the Disc tab.
* Here you can adjust the Starting Position and rip only specific titles or chapters.
* Enter file name making sure to end with .MPG, and start ripping.
* Click Save.
2. Record videos: With the new VLC, you can record videos during playback. The record button is hidden by default. To see it, click on View>Advanced Control. The record button will now appear. Clicking on the button while playing a movie or video will start recording. Clicking again will stop recording.
3. Play RAR files: Do you know VLC can play videos zipped inside RAR files? They play like normal video files and you can even use the seek bar. If the RAR file is split into several files, no problem. Just load the first part (.part001.rar ) and it will automatically take the rest of the parts and play the whole file.
4. Play in ASCII mode: VLC media player has an amusing ability, to playback movies in ASCII art. To enable ASCII mode, open VLC media player and click on Tools>Preferences. Open the section “Video” section and under “Output” select “Color ASCII art video output” from the drop down menu. Save it. Now play any video file to enjoy the ASCII art.
5. Listen to online radio: VLC includes hundreds of Shoutcast radio stations. You just need to enable it through Media>Services Discovery>Shoutcast radio listings. Now, open the Playlist and browse through the stations.
6. Convert Audio and Video formats: In VLC you can convert video and audio files from one format to another. Several different formats are supported like MP4, WMV, AVI, OGG, MP3 etc. To access the converter:
* Go to Media>Convert/Save.
* Load the file you want to convert using the Add button and click Convert.
* Now choose the output format and output file location.
7. Download YouTube and other online videos: First grab the URL of the YouTube video page. Now click on Media>Open Network stream. Paste the URL and click Play.
Once VLC starts streaming the video, click Tools>Codec Information and at the bottom of the window you will see a Location box. Copy the URL and paste it on your browser’s address bar. The browser will now download the file which you can save it to your hard disk.
[TUT]New way 2 hack XP Pass(No TOOL)
As u all folks kno how to hack Admin pass by various tools & live cds but here its sumthing different i found to hack it by actually not using any tool other than the bootable XP cd itself!!
Although many of XP users hav migrated to vista /win7 but thought dat many of u must not be knowing so sharing it....
So lets start it here now.....
1. Place your Windows XP CD in your cd-rom and start your computer (it's assumed here that your XP CD is bootable as it should be - and that you have your bios set to boot from CD)
2. Keep your eye on the screen messages for booting to your cd Typically, it will be
:Press any key to boot from cd
3. Once you get in, the first screen will indicate that Setup is inspecting your system and loading files.
4. When you get to the Welcome to Setup screen, press ENTER to Setup Windows now
5. The Licensing Agreement comes next - Press F8 to accept it.
6. The next screen is the Setup screen which gives you the option to do a Repair.
It should read something like If one of the following Windows XP installations is damaged, Setup can try to repair it
Use the up and down arrow keys to select your XP installation (if you only have one, it should already be selected) and press R to begin the Repair process.
7. Let the Repair run. Setup will now check your disks and then start copying files which can take several minutes.
8. Shortly after the Copying Files stage, you will be required to reboot. (this will happen automatically you will see a progress bar stating Your computer will reboot in 15 seconds
9. During the reboot, do not make the mistake of pressing any key to boot from the CD again! Setup will resume automatically with the standard billboard screens and you will notice Installing Windows is highlighted.
10. Keep your eye on the lower left hand side of the screen and when you see the Installing Devices progress bar, press SHIFT + F10. This is the security hole! A command console will now open up giving you the potential for wide access to your system.
11. At the prompt, type NUSRMGR.CPL and press Enter. Voila! You have just gained graphical access to your User Accounts in the Control Panel.
12. Now simply pick the account you need to change and remove or change your password as you prefer. If you want to log on without having to enter your new password, you can type control userpasswords2 at the prompt and choose to log on without being asked for password. After you've made your changes close the windows, exit the command box and continue on with the Repair (have your Product key handy).
13. Once the Repair is done, you will be able to log on with your new password (or without a password if you chose not to use one or if you chose not to be asked for a password). Your programs and personalized settings should remain intact.
I tried it on Xp2
dont have an idea about Xp3.
Subscribe to:
Posts (Atom)