
Now the wait is over. Since when Microsoft released Windows 7, no one was able to change the boot screen as it requires lots of files and certificates hacks.
But now Jeff Bush @ "Coder for life" website has developed an excellent tool which can customize Windows 7 boot screen.
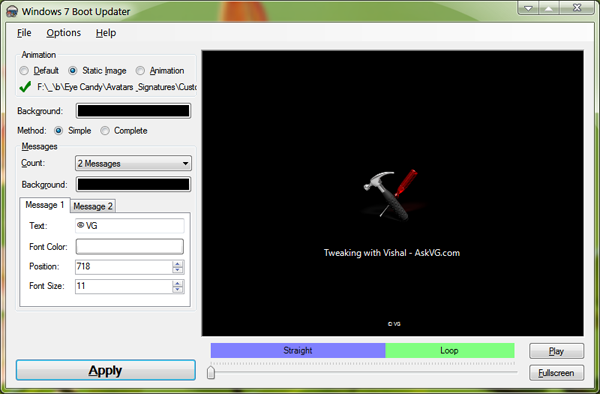
"Windows 7 Boot Animation Updater" is a program that makes it easy to update the Windows 7 boot animation and text. It is written in C++/CLI and requires Microsoft .NET Framework 2.0 and the Microsoft WIM library.
Features List:
- Modifies the boot animation
- Modifies the boot text "Starting Windows" and "Microsoft Corporation"
- Will compile the animation from 105 BMP, PNG, GIF, or TIFF images
- Does not require any other applications (like ImageX)
- Designed to be idiot-proof by having numerous checks
- Automatically backs up the modified files
- Works for all versions of Windows 7: any language, any edition, 32-bit or 64-bit
- Works even if your setup has the hidden "System Reserved" partition
The software is available for both 32-bit and 64-bit versions.
HOW TO USE:
1. Download and run the program's exe file.
2. You can change the desired text messages, remove them completely, change their color. You can also select a static image to show as boot logo.
3. If you want to change Windows flag animation shown in boot screen, you'll need to create the animation. The animation can be a single 200x21000 px BMP file or you can create 105 BMPs, PNGs, GIFs, or TIFFs files and put them in a single folder. Make sure all the files must be the same format and will be played in alphabetical order at boot screen (so if you are numbering them, use three digits always, e.g. 000, 001, ..., 103, 104).
Click on "Animation" radio button and select the folder containing your images. It'll take a few seconds and you can restart your system to take affect.
HOW TO RESTORE:
If you get stuck forever in Windows Recovery Environment then you need to manually restore winload.exe. Here are the directions:
1. Once you enter Windows Recovery Environment press "Cancel" right away (while it is still scanning).
2. Click "Yes" on the warning that pops up.
3. Click "View advanced options for system recovery and support".
4. Select your keyboard types and click "Next".
5. Select an account (not "HomeGroupUser$") and enter password and click "OK".
6. Click "Command Prompt" (the last option) and enter following commands:
C:
cd \Windows\System32
del winload.exe
ren "winload - Backup.exe" winload.exe
cd \Windows\Boot\PCAT
del bootmgr
ren "bootmgr - Backup" bootmgr
exit
PS: Here C: in first line represents the system drive where Windows 7 is installed in your system. If you have installed Windows in any other partition like D: drive, then change the command to D:
7. Click "Restart" and you'll be able to boot into Windows again.
what is the perfect BMP images resolution to use 105 bmp files on hd 1366 x 768 laptop??
ReplyDelete