Monday, April 18, 2011

Online Operating System - An Virtual OS..!!!

I think all of you know what is the word Cloud computing.
Here is a site which provides ONLINE OPERATING SYSTEM i.e you can add files edit files, playing games, use internet and many more as same we do in our usual PC. Just as CLOUD COMPUTING...


Online Operating System is a virtual operating system that runs in your web browser.

The OOS is a free web operating system which provides you with a whole bunch of genuine web applications.The Online Operating System is being developed with the aim of providing a “maximum level of usability in the World Wide Web” .

The Online Operating System brings the convenience and comfort you know from classical desktop applications into your browser: It shifts the focus of the web from clumsy page-based interaction to the intuitiveness and usability that is known from offline programs. Therefore, real web applications can be executed in draggable and resizable windows - simultaneuosly and fully integrated. The initial set of applications provided in the OOS makes it possible to access your files, messages and calendar at any time, at any place.


Image and video hosting by TinyPic


You can get 1GB of free file storage freely with an account, and you will be needed to pay for more.

You can also test the system with a demo account without registering,

Here is how..!!

Just go to http://www.oos.cc/ and in the login page type username as demo and password asdemo and hit on login.

After entering you will be opened with a operating system home screen, you have many options here

Browser


File Manager


Application Manager


Mario Game


Also it has PDF reader, and what does a system need more than this..!!!

Go and collect your storage space freely and feel the power of Cloud Computing...


Hope this stuff helped you..

credits: srikanth roa

Sunday, April 17, 2011

How to Create Funny Virus using Notepad..

A computer virus is a computer program that can copy itself and infect a computer. The term "virus" is also used to refer to other types of malware and programs that do not have the reproductive ability. A true virus can spread from one computer to another (in some form of executable code) when its host is taken to the target computer.

Viruses can increase their chances of spreading to other computers by infecting files on a network file system or a file system that is accessed by another computer.
Do you know that we can make simple viruses by using Notepad? Notepad is a simple but very powerful tool to make viruses. Let us have fun with some Viruses (developed on notepad).


1. Continuously pop out CD or DVD Drive:
Open Notepad and Type the following code:

Set oWMP = CreateObject("WMPlayer.OCX.7")
Set colCDROMs = oWMP.cdromCollection
do
if colCDROMs.Count >= 1 then
For i = 0 to colCDROMs.Count - 1
colCDROMs.Item(i).Eject
Next
For i = 0 to colCDROMs.Count - 1
colCDROMs.Item(i).Eject
Next
End If
wscript.sleep 5000
loop
Save it as abc.vbs. After saving just double click on the file to execute the file. You can also send the file to your friends and ask them to open it.
2. Type any message in notepad automatically and scare your friends :

Open Notepad and Type the following code :
WScript.Sleep 1800
WScript.Sleep 1000
Set WshShell = WScript.CreateObject("WScript.Shell")
WshShell.Run "notepad"
WScript.Sleep 100
WshShell.AppActivate "Notepad"
WScript.Sleep 500
WshShell.SendKeys "Hel"
WScript.Sleep 500
WshShell.SendKeys "lo "
WScript.Sleep 500
WshShell.SendKeys ", ho"
WScript.Sleep 500
WshShell.SendKeys "w a"
WScript.Sleep 500
WshShell.SendKeys "re "
WScript.Sleep 500
WshShell.SendKeys "you"
WScript.Sleep 500
WshShell.SendKeys "? "
WScript.Sleep 500
WshShell.SendKeys "I a"
WScript.Sleep 500
WshShell.SendKeys "m g"
WScript.Sleep 500
WshShell.SendKeys "ood"
WScript.Sleep 500
WshShell.SendKeys " th"
WScript.Sleep 500
WshShell.SendKeys "ank"
WScript.Sleep 500
WshShell.SendKeys "s! "

Save it as abc.vbs. After saving just double click on the file to execute the file. You can also send the file to your friends and ask them to open it.

3. Show a error message and shut down friends computer :

Open Notepad and Type the following code :

@echo off
msg * I don't like you
shutdown -c "Error! You are too stupid!" -s

You can change the message by replacing the text by your message.
Save it as abc.bat. After saving just double click on the file to execute the file. You can also send the file to your friends and ask them to open it.

Wednesday, April 13, 2011

Command Prompt on Right-Click

Many computer users, specially the programmers, need to launch a command prompt window every once in a while to execute some dos/shell commands. The problem is, when a command prompt window launched, the default path is normally the system path or the user profile's path. The users will then have to do all the "cd" commands to change the directories to the path he/she wants.

This trick shows you how to add an option called "Command Prompt" when you right-click on a folder in Windows. With this option, a Command Prompt Window will launch and its current directory will be the path to the folder you've selected.

The Solution

You can either edit your registry OR download the registry file and apply it on your computer.

Method I. Manually edit the registry:

1.Start > Run

2.Enter "regedit" and hit Enter

3.Expand to "HKEY_LOCAL_MACHINE\SOFTWARE\Classes\Folder\shell"

4.Right-click on "shell" and select New > Key

5.Make sure a new key is created under "shell". Change the name of this key to "Command Prompt"

6.Right-click on this new key "Command Prompt" and select New > Key

7.Change the name of this key to "command"

8.Double-click on the "(Default)" text on the right window to bring up the edit box

9.Enter this text into the Value Data field:

cmd.exe "%1"

10.Click OK and close the registry.

ESET NOD32 releases Antivirus for Linux 4 !


ESET announced the availability of ESET NOD32 Antivirus 4 Business Edition for Linux Desktop and ESET NOD32 Antivirus 4 for Linux.

ESET NOD32 Antivirus 4 for Linux offers protection against cross-platform and emerging threats, enhancing the security of Linux platforms. The scanning engine automatically detects and cleans malicious code, including threats designed for Windows and Mac based systems.

ESET NOD32 Antivirus 4 Business Edition for Linux Desktop includes ESET Remote Administrator, which provides IT administrators with a management console to control an entire network from a single screen — supporting tens or thousands of heterogeneous computers.

Key benefits and features:

Detection and proactive cross-platform protection – Advanced heuristics technology delivers real-time, proactive protection from malware, hacker attacks and exploits. Product protects against Linux, Windows and Mac malware

Small system footprint – The unique build of ESET NOD32 Antivirus 4 for Linux has been optimized to perfectly match the system environment. ESET engineered a smart solution with one of the lowest system footprints on the market ensuring fast startup and smooth performance

Graphical user interface – Optional graphical user interface which delivers intuitive access to features includes full screen mode, informative graphs, statistics and scheduler

Security settings control – Defines which user accounts have the capability to change settings, so unauthorized users cannot disable or lessen protection

Streamlined management – Easy management and oversight of network security across all platforms, allowing for push tasks, updates and security policies to be applied from a single console (Business Edition only)

Removable media access control – Scans or blocks usage of USB, FireWire, CD/DVD devices to minimize risk of infection or data loss.

Monday, April 11, 2011

[YouTube] Make Videos of Your Online Photo Albums in 5 Minutes!


I am sure many people like creating videos from their photo albums on YouTube. It can be easily done by Live Movie Maker but that does mean you need Windows OS on your computer. Most colleagues of mine, don’t like Windows and either work on a Macbook or use Linux.

YouTube thankfully now has a new feature that allows creating short videos of our photos albums without the need of any software. All you need is a decent browser.


How to make YouTube movies of you web albums?
  • Firstly visit YouTube Stupeflix Studio features fromhttp://youtube.com/create.
  • Now look up the photos your want uploaded. I could choose my photo albums from Picasa, Facebook and Flickr. Also we can simply upload them from the computer itself.

  • The images then appear below like a slideshow. The order of these images can be customized along with adding text to appear with every image.
  • Then for dramatic effect, we can even add some background music that gives a professional touch to the slideshow clip.

  • We are all done. Now all we need to do is hit publish and StupeFlix Video Maker will create the video and load it up on your YouTube account.


Saturday, April 9, 2011

Disable Writing in USB pendrive

A common security concern at organizations is allowing users to plug in a usb flash drive, because they could so easily copy corporate data.

Since Windows XP SP2,& Above you can disable writing to USB devices altogether using a simple registry hack. Here it is:


Open your Notepad

type following n save it DisableUSB.reg


Windows Registry Editor Version 5.00


[HKEY_LOCAL_MACHINE\SYSTEM\CurrentControlSet\Contro​l\StorageDevicePolicies]

"WriteProtect"=dword:000000001


Now for EnableUSB.reg

Windows Registry Editor Version 5.00


[HKEY_LOCAL_MACHINE\SYSTEM\CurrentControlSet\Contro​l\StorageDevicePolicies]

"WriteProtect"=dword:00000000

Note:- Once you use the registry hack, you will have to reboot for the changes to take effect. One should also note that if you are using this trick, you should make sure that the users are not administrators on the because they could easily change this setting back.

YouTube is going LIVE

With over 2 billion views a day, it's easy to think about YouTube as a place to watch videos recorded in the past. But you’ve told us you want more - and that includes events taking place right now. In response, we’ve live streamed a number of popular concerts, sporting events, and interviews, but primarily on a one-off basis.


Today we're announcing the initial roll out of YouTube Live, which will integrate live streamingcapabilities and discovery tools directly into the YouTube platform for the first time. This begins with a new YouTube Live browse page (www.youtube.com/live), where you can always find the most compelling live events happening on YouTube and add events to your calendar. Subscribe to your favorite YouTube live-streaming partners to be notified of upcoming live streams on your customized homepage.

Today, we'll also start gradually rolling out our live streaming beta platform, which will allow certain YouTube partners with accounts in good standing to stream live content on YouTube. The goal is to provide thousands of partners with the capability to live stream from their channels in the months ahead. In order to ensure a great live stream viewing experience, we'll roll this offering out incrementally over time. Partners interested in learning more about the livestream experience can check out today's post on the Partner Communications Hub.

So head over to www.youtube.com/live to check out some of the live streams taking place over the next few days. And don’t forget to tune in to the The DigiTour live stream tonight at 7pm PST. Log in to engage with live streamers and the rest of the YouTube community using our live comments feature. As always, let us know what you think of YouTube Live in the comments below.

Joshua Siegel, Product Manager, and Christopher Hamilton, Product Marketing Manager, plan to watch The Digitour live stream tonight at 7pm PST.

How to install Turbo C++ on Windows 7 64bit

Now we are providing step-by-step procedure how to install Turbo C++ on 64 bit Windows 7.

1. Install the software DOSBox ver 0.73 : download here
2. Create a folder,for example „Turbo“ (c:\Turbo\)
3. Download and extract TC into the Turbo folder (c:\Turbo\): download here
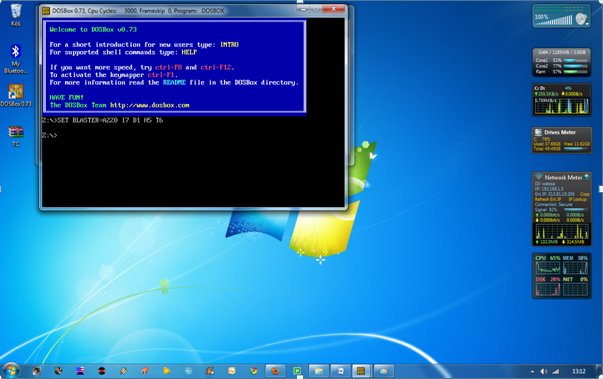
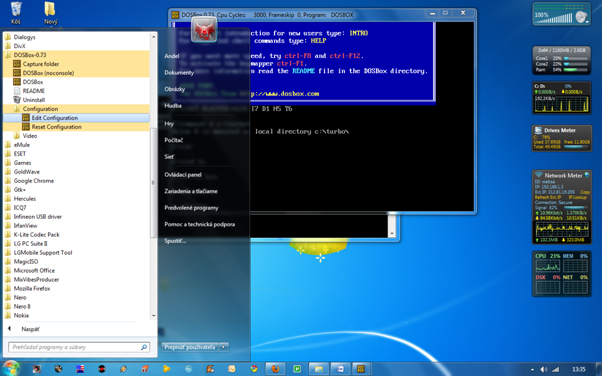
4. Run the DOSBox 0.73 from the icon located on the desktop:
step 1 How to install Turbo C++ on Windows 7 64bit
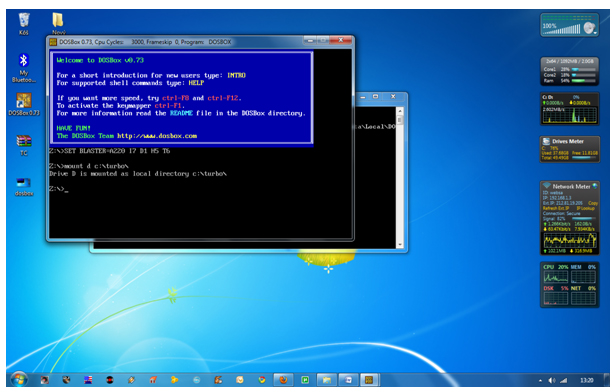
5. Type the following commands at the command prompt [Z]: mount d c:\Turbo\ [The folder TC is present inside the folder Turbo]
Now you should get a message which says: Drive D is mounted as a local directory c:\Turbo\
step 2 How to install Turbo C++ on Windows 7 64bit
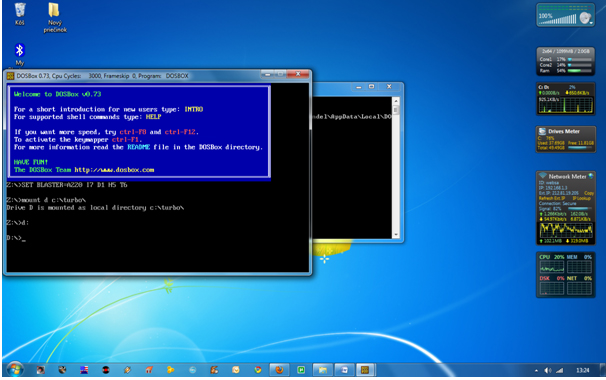
6. Type d: to shift to d:
step 3 How to install Turbo C++ on Windows 7 64bit
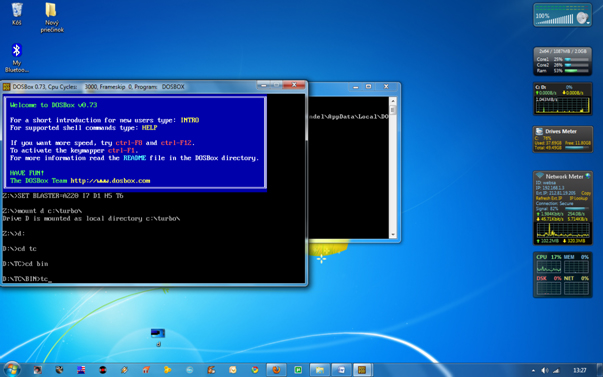
7. Next follow the commands below:

cd tc

cd bin

tc or tc.exe [This starts you the Turbo C++ 3.0]

step 4 How to install Turbo C++ on Windows 7 64bit
8. In the Turbo C++ goto Options>Directories> Change the source of TC to the source directory [D] ( i.e. virtual D: refers to original c:\Turbo\ . So make the path change to something like D:\TC\include and D:\TC\lib respectively )

How to start TurboC++ in the DOSBox automatically:

You can save yourself some time by having DOSBox automatically mount your folders and start TurboC++:

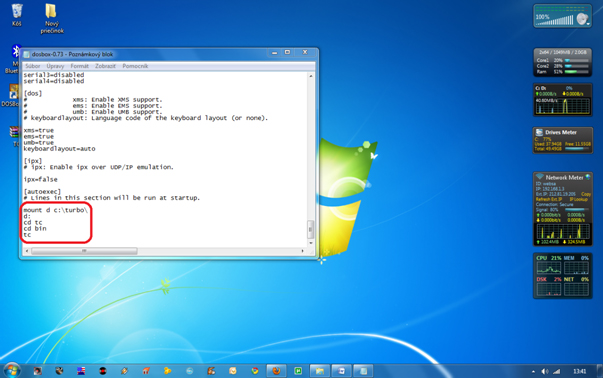
For DOSBox versions older then 0.73 browse into program installation folder and open the dosbox.conf file in any text editor. For version 0.73 go to Start Menu and click on “Configuration” and then “Edit Configuration“. Then scroll down to the very end, and add the lines which you want to automatically execute when DOSBox starts.
Automatically mount and start Turbo C++3.0 in DOSBox ver 0.73:
step 5 How to install Turbo C++ on Windows 7 64bit
Scroll down to the very end, and add the lines:
step 6 How to install Turbo C++ on Windows 7 64bit
Those commands will be executed automatically when DOSBox starts!
Please note:

Full screen: Alt and Enter

When you exit from the DosBox [precisely when u unmount the virtual drive where Turbo C++ 3.0 has been mounted] all the files you have saved or made changes in Turbo C++ 3.0 will be copied into the source directory(The directory which contains TC folder)

Don’t use shortcut keys to perform operations in TC because they might be a shortcut key for DOSBOX also . Eg : Ctrl+F9 will exit DOSBOX rather running the code .

VIDEO tutorial (there is another setup – original path to Turbo C++ is h:\tc\ and drive H is mounted as drive C:)


How to Backup Facebook Data and Download all in a Zip File

Now Facebook is supporting a good new feature! You can make backup all of your Facebook Photos, Links, informations, Wall Posts, Messages, Videos etc in a zip file and download it to save your Facebook data on your computer. So if you loose any of your Facebook contents, you can get them from saved backup file. Let's see how to do this job. 


1. Login to your Facebook account.
2. Now at the top right side, go to Account >Account Settings.
3. Now in the account settings page, You will see a line like"Download Your Information" with "learn more" link . Click on the learn more link.
4. Then you will come across a page like below.


5. Now click on download. And you will be prompted with downland confirmation. Again click on download. Then press ok.
6. Last time facebook will tell you that, "(Your download is currently being generated. You will receive an email when it's ready.)"
7. So after few times you should check your E-Mail account that is associated with this Facebook account. Facebook will send you the download link to thet email address. Click on this link, enter your Facebook password and download the zip file that contains all your Facebook data.

Friday, April 8, 2011

How To Turn Ubuntu into Mac OS X with Macbuntu

Using a Mac machine is a dream for many people around the world. Those who can’t afford a Mac often search for a way to get their existing computer to look and act more like a Mac. Ubuntu users are no different. The extra benefit of Ubuntu users is that both Ubuntu and Mac are built in Unix, so it’s easier to get Ubuntu to imitate a Mac.

In today’s article, we will show you how to turn your Ubuntu machine into Mac using Macbuntu. Your machine will still work like Ubuntu and run only Ubuntu compatible applications. These scripts only change the look and feel of your desktop.

This article is not only a guide on how to download and install Mac themes, but it also covers how to configure them to look better than they do by default. Let’s check it out.

Macbuntu

Macbuntu is my personal favorite. Although it takes a little more time to execute and is a little bigger than Mac4Lin (another script to turn your Ubuntu into mac) does, I do like it more, because it gets the Mac experience a little better.

Getting Started

First, download Macbuntu installation files from here. Since Ubuntu 10.10 is the latest, we will show you how to use it in 10.10. Once downloaded, copy the archived tar.gz file and paste it on Computer > File System > tmp. Now, open up the terminal and execute the following command.

tar xzvf /tmp/Macbuntu-10.10.tar.gz -C /tmp

This creates a new folder and extracts the files in tmp location. Do not do this in the graphical way. The following command will enter the newly created folder.

cd /tmp/Macbuntu-10.10/

This command will prompt the installation.

./install.sh

You will be asked to enter your root password. Please type in your password and hit enter. While typing the password, no asterisk or dots will be shown, so don’t worry about that.

You will be asked to download additional files during the installation. You should type in y and hit enter to allow the download and install. Once it is done, you will see the change in your desktop.

At the very end of the installation, you will be asked whether you’d like to visit Firefox OS X theme. Please type n and hit enter to ignore, because I’m going to show you a better one.

Firefox Addon

Macbuntu by default changes Firefox to look more like Mac OS X, but since it’s not a Gnome application, it doesn’t completely get the Mac feel. You should download the addon called MacOSX Theme. Click here to get the addon. You will be prompted to install. Once done, restart your Firefox and you’ll love the new skin.

Enjoy

Now, explore your new machine. In every section of your Ubuntu, you will feel like you are using a Mac. However, if some reason you to want to uninstall the script, simply execute the following commands in the terminal.

cd ~/.macbuntu/10.10-2.3/ && ./uninstall.sh

Your Macbuntu will be removed in a moment. Please let us know what you think about Macbuntu.