Saturday, April 9, 2011

How to install Turbo C++ on Windows 7 64bit

Now we are providing step-by-step procedure how to install Turbo C++ on 64 bit Windows 7.

1. Install the software DOSBox ver 0.73 : download here
2. Create a folder,for example „Turbo“ (c:\Turbo\)
3. Download and extract TC into the Turbo folder (c:\Turbo\): download here
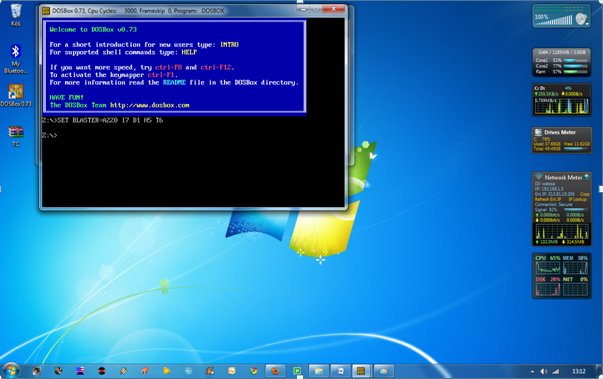
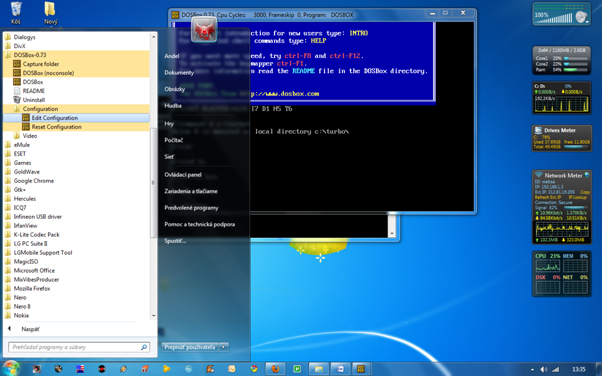
4. Run the DOSBox 0.73 from the icon located on the desktop:
step 1 How to install Turbo C++ on Windows 7 64bit
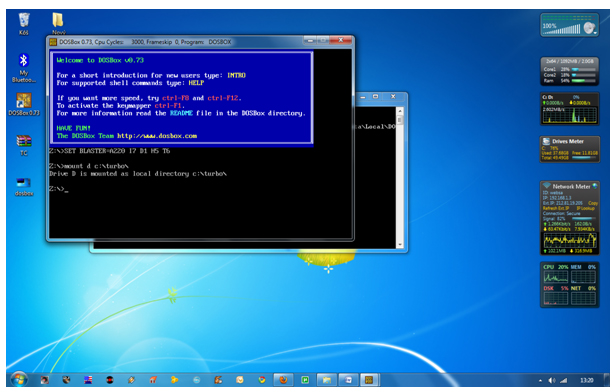
5. Type the following commands at the command prompt [Z]: mount d c:\Turbo\ [The folder TC is present inside the folder Turbo]
Now you should get a message which says: Drive D is mounted as a local directory c:\Turbo\
step 2 How to install Turbo C++ on Windows 7 64bit
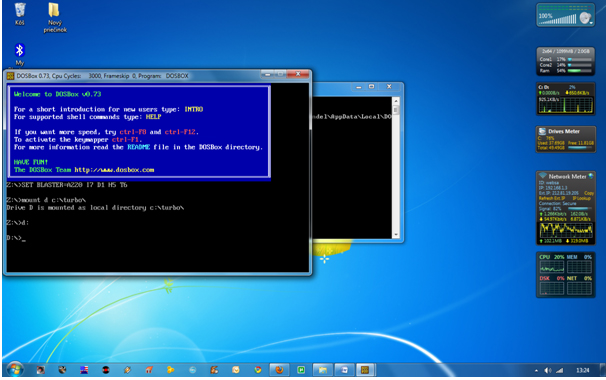
6. Type d: to shift to d:
step 3 How to install Turbo C++ on Windows 7 64bit
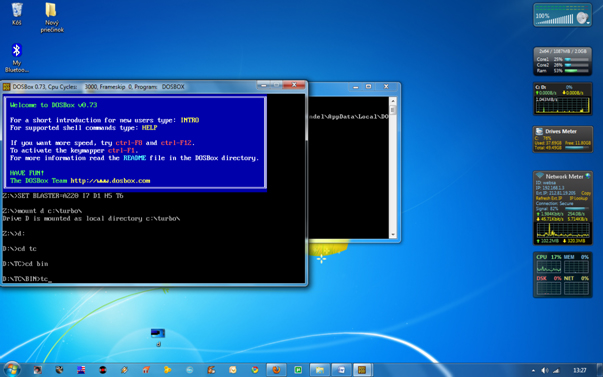
7. Next follow the commands below:

cd tc

cd bin

tc or tc.exe [This starts you the Turbo C++ 3.0]

step 4 How to install Turbo C++ on Windows 7 64bit
8. In the Turbo C++ goto Options>Directories> Change the source of TC to the source directory [D] ( i.e. virtual D: refers to original c:\Turbo\ . So make the path change to something like D:\TC\include and D:\TC\lib respectively )

How to start TurboC++ in the DOSBox automatically:

You can save yourself some time by having DOSBox automatically mount your folders and start TurboC++:

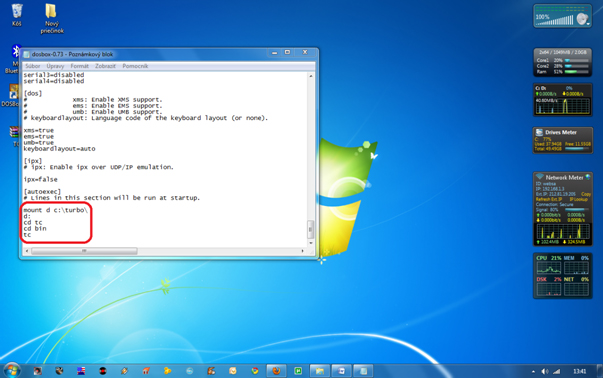
For DOSBox versions older then 0.73 browse into program installation folder and open the dosbox.conf file in any text editor. For version 0.73 go to Start Menu and click on “Configuration” and then “Edit Configuration“. Then scroll down to the very end, and add the lines which you want to automatically execute when DOSBox starts.
Automatically mount and start Turbo C++3.0 in DOSBox ver 0.73:
step 5 How to install Turbo C++ on Windows 7 64bit
Scroll down to the very end, and add the lines:
step 6 How to install Turbo C++ on Windows 7 64bit
Those commands will be executed automatically when DOSBox starts!
Please note:

Full screen: Alt and Enter

When you exit from the DosBox [precisely when u unmount the virtual drive where Turbo C++ 3.0 has been mounted] all the files you have saved or made changes in Turbo C++ 3.0 will be copied into the source directory(The directory which contains TC folder)

Don’t use shortcut keys to perform operations in TC because they might be a shortcut key for DOSBOX also . Eg : Ctrl+F9 will exit DOSBOX rather running the code .

VIDEO tutorial (there is another setup – original path to Turbo C++ is h:\tc\ and drive H is mounted as drive C:)


How to Backup Facebook Data and Download all in a Zip File

Now Facebook is supporting a good new feature! You can make backup all of your Facebook Photos, Links, informations, Wall Posts, Messages, Videos etc in a zip file and download it to save your Facebook data on your computer. So if you loose any of your Facebook contents, you can get them from saved backup file. Let's see how to do this job. 


1. Login to your Facebook account.
2. Now at the top right side, go to Account >Account Settings.
3. Now in the account settings page, You will see a line like"Download Your Information" with "learn more" link . Click on the learn more link.
4. Then you will come across a page like below.


5. Now click on download. And you will be prompted with downland confirmation. Again click on download. Then press ok.
6. Last time facebook will tell you that, "(Your download is currently being generated. You will receive an email when it's ready.)"
7. So after few times you should check your E-Mail account that is associated with this Facebook account. Facebook will send you the download link to thet email address. Click on this link, enter your Facebook password and download the zip file that contains all your Facebook data.

Friday, April 8, 2011

How To Turn Ubuntu into Mac OS X with Macbuntu

Using a Mac machine is a dream for many people around the world. Those who can’t afford a Mac often search for a way to get their existing computer to look and act more like a Mac. Ubuntu users are no different. The extra benefit of Ubuntu users is that both Ubuntu and Mac are built in Unix, so it’s easier to get Ubuntu to imitate a Mac.

In today’s article, we will show you how to turn your Ubuntu machine into Mac using Macbuntu. Your machine will still work like Ubuntu and run only Ubuntu compatible applications. These scripts only change the look and feel of your desktop.

This article is not only a guide on how to download and install Mac themes, but it also covers how to configure them to look better than they do by default. Let’s check it out.

Macbuntu

Macbuntu is my personal favorite. Although it takes a little more time to execute and is a little bigger than Mac4Lin (another script to turn your Ubuntu into mac) does, I do like it more, because it gets the Mac experience a little better.

Getting Started

First, download Macbuntu installation files from here. Since Ubuntu 10.10 is the latest, we will show you how to use it in 10.10. Once downloaded, copy the archived tar.gz file and paste it on Computer > File System > tmp. Now, open up the terminal and execute the following command.

tar xzvf /tmp/Macbuntu-10.10.tar.gz -C /tmp

This creates a new folder and extracts the files in tmp location. Do not do this in the graphical way. The following command will enter the newly created folder.

cd /tmp/Macbuntu-10.10/

This command will prompt the installation.

./install.sh

You will be asked to enter your root password. Please type in your password and hit enter. While typing the password, no asterisk or dots will be shown, so don’t worry about that.

You will be asked to download additional files during the installation. You should type in y and hit enter to allow the download and install. Once it is done, you will see the change in your desktop.

At the very end of the installation, you will be asked whether you’d like to visit Firefox OS X theme. Please type n and hit enter to ignore, because I’m going to show you a better one.

Firefox Addon

Macbuntu by default changes Firefox to look more like Mac OS X, but since it’s not a Gnome application, it doesn’t completely get the Mac feel. You should download the addon called MacOSX Theme. Click here to get the addon. You will be prompted to install. Once done, restart your Firefox and you’ll love the new skin.

Enjoy

Now, explore your new machine. In every section of your Ubuntu, you will feel like you are using a Mac. However, if some reason you to want to uninstall the script, simply execute the following commands in the terminal.

cd ~/.macbuntu/10.10-2.3/ && ./uninstall.sh

Your Macbuntu will be removed in a moment. Please let us know what you think about Macbuntu.

Thursday, March 31, 2011

KASPERSKY 2011 LICENSE FOREVER


  1. First of all delete the existing key if you have.
  2. Go to setting,then select Option,Uncheck the "Enable Self Defense" and click OK.
  3. Now right-click the kaspersky icon from taskbar and click on "Exit".
  4. You will get a prom. Click "Yes".
  5. Now go to run and type in "regedit".
  6. Now goto HKEY_LOCAL_MACHINE --->SOFTWARE --->KASPERSKYLAB --->PROTEDCTED --->AVP9 --->ENVIRONMENT
  7. Now in the right hand side you can see PCID. Double click it and change the last two values before the flower bracket and click ok eg:- The last two values are "D7"...So i change it to "F9".
  8. Now open kaspersky again.
  9. Select "Activate trial License" and click next.
  10. Now enable Self-Defence and you are good to go.

Wednesday, March 30, 2011

How to Change Windows 7 Boot Screen Using Windows 7 Boot Animation Updater

Now the wait is over. Since when Microsoft released Windows 7, no one was able to change the boot screen as it requires lots of files and certificates hacks.

But now Jeff Bush @ "Coder for life" website has developed an excellent tool which can customize Windows 7 boot screen.

"Windows 7 Boot Animation Updater" is a program that makes it easy to update the Windows 7 boot animation and text. It is written in C++/CLI and requires Microsoft .NET Framework 2.0 and the Microsoft WIM library.

Features List:

  • Modifies the boot animation
  • Modifies the boot text "Starting Windows" and "Microsoft Corporation"
  • Will compile the animation from 105 BMP, PNG, GIF, or TIFF images
  • Does not require any other applications (like ImageX)
  • Designed to be idiot-proof by having numerous checks
  • Automatically backs up the modified files
  • Works for all versions of Windows 7: any language, any edition, 32-bit or 64-bit
  • Works even if your setup has the hidden "System Reserved" partition

The software is available for both 32-bit and 64-bit versions.

HOW TO USE:

1. Download and run the program's exe file.

2. You can change the desired text messages, remove them completely, change their color. You can also select a static image to show as boot logo.

3. If you want to change Windows flag animation shown in boot screen, you'll need to create the animation. The animation can be a single 200x21000 px BMP file or you can create 105 BMPs, PNGs, GIFs, or TIFFs files and put them in a single folder. Make sure all the files must be the same format and will be played in alphabetical order at boot screen (so if you are numbering them, use three digits always, e.g. 000, 001, ..., 103, 104).

Click on "Animation" radio button and select the folder containing your images. It'll take a few seconds and you can restart your system to take affect.

Download Link

HOW TO RESTORE:

If you get stuck forever in Windows Recovery Environment then you need to manually restore winload.exe. Here are the directions:

1. Once you enter Windows Recovery Environment press "Cancel" right away (while it is still scanning).

2. Click "Yes" on the warning that pops up.

3. Click "View advanced options for system recovery and support".

4. Select your keyboard types and click "Next".

5. Select an account (not "HomeGroupUser$") and enter password and click "OK".

6. Click "Command Prompt" (the last option) and enter following commands:

C:
cd \Windows\System32
del winload.exe
ren "winload - Backup.exe" winload.exe
cd \Windows\Boot\PCAT
del bootmgr
ren "bootmgr - Backup" bootmgr
exit

PS: Here C: in first line represents the system drive where Windows 7 is installed in your system. If you have installed Windows in any other partition like D: drive, then change the command to D:

7. Click "Restart" and you'll be able to boot into Windows again.

Saturday, March 26, 2011

HOW TO TRACE A HACKER WHO HACKED YOU


Here we go :)

1:open command prompt(CMD)

2:type in that netstat -b or -o

3:then you will see all the connections to your pc

4:open task manager then go to view then select columns then Process
Identifier(Pid)

5:now open CMD you should see all the ip and sites or networking
applications they have a Process Identifier

6:compare them and find a weired process like svchost then trace where the file is

7:kill the process then delete the file creating it, check your startup for it also

8:go to run and type msconfig

9:go to startup and disable all the things weird

very easy tutorial.......

Friday, March 25, 2011

Social-Network-Fake-Account-Makers-Are-Threatened with a fine upto 1000$


For some people,creating a fake account is social networking sites might be a fun joke.But don't ever try doing this kind of prank in California because you can face the law.It's not just a threat but there is a law governing this case.

California has set a law to arrest fake account makers or anyone who is impersonating someone else in the online realm.

"Anyone who intentionally and without consent impersonate someone else in the media through the Internet or other electronicmedias for the purpose of harming,intimidating ,threatening or deceiving others,has conducted a criminal offense,"read one of the points in the law,according to San Francisco Gate.

The punishment for perpetrators is not lite.Those who are caught making fake accounts could be thrown into prison or receive a fine of 1,000$.

So Please Co-Operate With Social Networking Sites Rules.If you dont want to Shutdown any Social Networking Site.Like Facebook,Orkut,Twitter etc..